|
 |
This removal takes 20 - 30 minutes of actual work most of which is spent getting to the CDV. This is really easy to do but remember that the clutch will need to be bleed after all is said and done.
Click on the images for larger views. |
Step 1: Getting the required items together
This install requires:
- A lift or hydraulic jack and jack stands or ramps
- Socket wrench
- 8mm socket
- 2 17mm Open wrenches (preferably flare wrenches)
- 11mm Open wrench (preferably flare wrench)
- Small "C" clamp (optional but it will be the best $0.99 you have spent in a while - Thanks to Captain_Winters for the idea!)
- A BMW M3 (E46).
- 20 - 30 minutes of free time.
|
 |
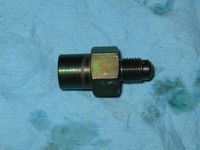
The Part That Does Not Exist :-) |
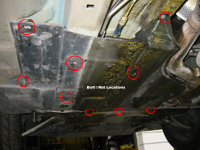
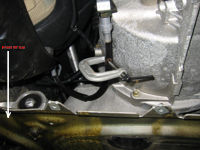
Step 2: Getting Started Under the Car
- Two of the plastic shields have to be removed in order to gain access to the CDV.
- Work from the driver's side of the car and remove the two shields pictured here -->
- The shields are have a series of 8mm screws and bolts as well as being interlocked with tabs.
- Remove the smaller shield that is closest to the side of the car first.
- Make a mental note at to how these are installed - this will make reinstalling them MUCH easier.
|
View From Under the Car
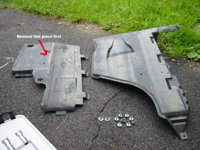
Shields Removed |
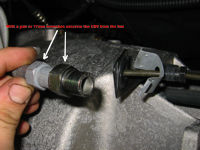
Step 3: Locate the CDV
- The CDV is located on the driver's side of the transmission.
- If you look at the second picture for this step you will see that the CDV fits through a bracket on the transmission and is connected to the hydraulic system via a 17mm fitting and to the transmission hydraulic line via an 11mm fitting.
|
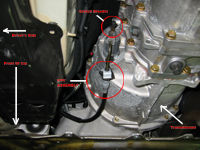
The Infamous CDV
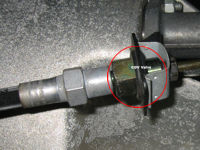
A Side View |
Step 4: Clamp That Sucker
- This does not have to be done but it sure helps keep from making a mess (thanks for Captain_winters from RoadFly for the idea).
- The hose going to the master cylinder is rubber and by using a small C clamp you can gently squeeze if off so that fluid does not spill all over the place.
- Don't gorilla the clamp, just tight enough to close the hose off.
|
C Clamp In Place |
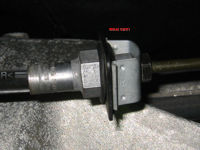
Step 5: Releasing The Transmission Side Of The CDV
- With a 17mm wrench on the CDV use an 11mm wrench to unscrew the fitting (on the side of the CDV going to the transmission)
- Once the fitting is unscrewed the CDV will pull out of the bracket.
|
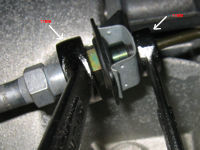
17mm Wrench On CDV, 11mm On Fitting
Fitting Released And CDV Exposed |
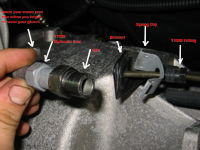
Step 6: Getting Rid Of The CDV
- Use a pair of 17mm wrenches (one on the CDV and one on the fitting on the hydraulic line you clamped) to loosen and unscrew the CDV.
- Once unscrewed save the CDV for posterity.
|
What To un-Screw With |
Step 7: Putting Things Back Together
- This could not be easier.
- Push the 17mm fitting on the hydraulic line through the bracket and clip the same way that the CDV was in there.
- Screw the 11mm fitting back into the 17mm fitting the same way as it was screwed into the CDV.
- Snug things up hand tight - no gorilla force needed.
- Remove the C Clamp.
- IMPORTANT: Bleed the clutch and check for leaks while you're at it.
|
Back Together Without The Phantom CDV |
Step 8: Replace the Plastic Shields
- Reverse the order in which you removed the shields.
- The shields have interlocking tabs which can make things a pain when putting them back on.
- Take your time and then snug up the screws/bolts that hold the shields in place and you're done.
|
|

|