|
 |
OK, I'm not claiming expertise here (not even close) but I do know a few people I would certainly call experts: Starting with Nick at DetailersParadise.com and Vaheh (aka JET) at Creiver. Since I was really dunce at the concept of detailing I placed my faith in their hands (well, mostly Nick's) and I was stunned at how easy, fast (relatively) and simple non-obsessive detailing could be and I was even more surprised how well my car that the dealership included a rather nasty set of swirl marks with free of charge could turn out even in my rather ham fisted detailing hands.
In this "DIY" I go through the steps that succeeded for me and the products (with DetailersParadise.com help) that led to what I would call exceptional results. I do not mean to imply that I am now a professional detailer but I now sure as hell know a few :-) and the results achieved have been more than worth the time and effort involved.
A word about getting your detailing stuff from DetailersParadise.com - JUST DO IT! I mean the owner even offered me his cell number if I got in trouble over the weekend using the stuff he recommenced! What more can you ask for?
Click on the images for larger views. |
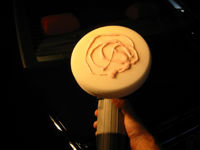
Step 1: Getting the required items together
This job requires:
|
 |
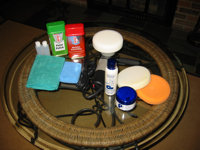
Stuff You Need |
Step 2: Gotta Clean Before You Can Detail
- Place car in a shaded spot - out of direct sunlight.
- Wet the car down with a hose.
- If there are bugs or road tar on the car spray those spots with einszett Anti Insekt and let it soak in.
- Spray the wheels with P21S Wheel Cleaner.
- Dump 2 cap-fulls of the P21S Bodywork Shampoo into one of the buckets.
- Fill both buckets with clean (preferably "softened") water.
- Now you have a bucket full of suds and a bucket full of clean water for rinsing your wash mitt/sponge.
- Believe it or not but there is a method to the 2 wool mitt method. The theory goes that you use one for pretty much all of the car above the door moldings and the other one for everything below them. This works on the idea that the top is much cleaner than the bottom and dragging the crap off the bottom to the top is a bad idea (which is true).
- So soak the "upper" mitt in the suds and start on the roof and work your way down - cleaning one panel at a time, rising the mitt in between each panel to make sure it stays clean.
- Once everything above the door moldings is washed grab the second mitt and clean everything below the moldings (again one panel at a time).
- Grab the sponge and wash the wheels.
- Spray the soap off the car - a helpful hint is to take the nozzle off the hose and just use the stream of water, you will find that if your car is at all waxed the simple open hose spray will sheet right off the car making it much easier to dry.
- Using the 2 Paradise Purple Waffle Weave Drying Towels dry off the car.
- Make sure to pop the hood (remember to lower the windshield wipers first!) and shake it out and the same for the trunk, doors and gas cap cover - you don't want water dripping down from these places leaving ugly runs. Also dry under the tail lights and the side mirrors to get the water out of there.
- Once the car is COMPLETELY dry you are ready to start detailing!
|
|
Step 3: Getting Ready To Detail
- There are additional steps one could/should take if the car's finish is abused or old such as clay bars, etc. My car is fairly new (04) and I'm not nearly anal retentive enough to clay it just for the hell of it.
- Other than any additional prep steps the most important things from here on out are:
- Make sure the car is a in shaded area - garage is best
- Make sure the car is clean and dry - you don't want to find out that there is some sort of crap still on the car when you take a polisher to it and rub what ever it was into the finish.
- The surface should be cool - if the sheet metal is hot it will "dry" the products used to detail too quickly not allowing them to work properly.
- Another thing I really can't stress enough is having adequate lighting - not just you garage light but preferably something like portable work lights (the halogen variety), etc. You want to see what you are doing both in order not to over do things and to make sure you don't miss anything.
|
|
Step 4: Types Of Compounds And Porter Cable
- There are 2 methods of bringing out a car's finish - chemical and mechanical - typically both methods are used to complement each other.
- Chemical cleaning involves using compounds that clean by dissolving or interacting with contaminants on the finish to remove them.
- Mechanical cleaning involves using compounds that contain abrasives to remove a contaminated or damaged layer of the finish.
- The Porter Cable orbital polisher is one of the premiere tools for both shade tree and professional detailers. Since its an orbital polisher/buffer it does not leave a "pattern" as it does its work and unlike the cheap crap from Sears, etc. it provides an enormous amount of flexibility by offering variable speeds, dozens of attachments and professional grade durability and results.
|
|
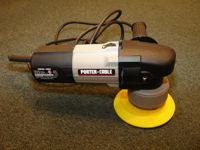
Porter Cable 7336 ("PC")
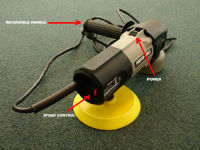
PC Controls
Offset and Weight |
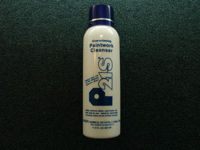
Step 5: Playing With Chemicals: P21S Gloss-Enhancing Paintwork Cleanser ("GPC")
- You have to remove old wax as well as any other stuff still on/in the paint before you can actually polish the car.
- GPC (part of the P21S bundle) does a very good job of removing both wax and residual crud as well as light acid rain and etching in the surface of the finish
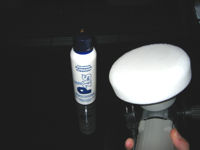
- Use the thick white pad that comes with the PC to apply GPC.
- Shake the bottle well and put a generous amount (maybe a 50 cent sized dab) on the pad.
- DON'T TURN ON THE PC!
- Put the PC on the area you will be starting with (I highly recommend the trunk panel since its flat and an easy place to get a feel for things).
- Without turning the PC on move it around a bit to smear the GPC into the pad an on to the car - this way it will not fly all over your garage when you turn the machine on :-)
- Set the speed on the PC to #4 and kick it on. Use a circular motion to cover the area you are working on (just do one area at a time - don't try to do the whole car at once).
- You don't need to play gorilla boy on the PC - just let its weight do the work.
- Work the GPC into the area you are on. Once you have finished with a given area let the GPC dry.
|
P21S Gloss-Enhancing Paintwork Cleanser ("GPC")
PC With Thick White Pad |
Step 6: What Goes On Must Come Off (part I)
- Once the GPC has dried (about 5 minutes - it will develop a haze much like wax does) use a microfiber towel to remove it
- Work in circles without too much pressure until all of the GPC is removed
- Turn the towel over often in order to make sure you're always using a clean, absorbent surface.
- HINT: Its a VERY good idea to use different microfiber towels to do different things that way you do not have different compounds on the same towel, etc. Microfiber is relatively cheap and paint jobs and time are expensive - always have more MF towels than you need.
|
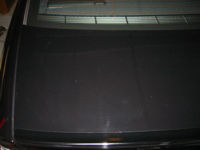
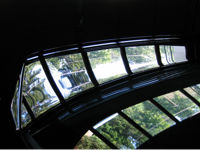
Trunk After Wash (note the etching and swirls, ugh)
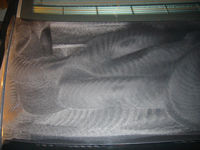
GPC Applied and Drying
GPC Removed, Looking Better! |
Step 7: On To Mechanical Work
- After you're done with GPC its time to go to actual polishing
- Install the Paradise 6 1/2" Orange Pad on the PC
- Grab the Einszett Paint Polish (green can) and one of the handy little bottles DetailersParadise.com sent you.
- Shake up the Einszett Paint Polish and fill the little bottle with it (this will make your life a lot easier)
- Apply the Einszett Paint Polish from the little bottle to the Paradise 6 1/2" Orange Pad
- Same principle applies here, put the pad down on the car before turning on the PC
- Set the speed to #4 and kick the PC on
- Again work the PC with light pressure in sections - don't go nuts here - you are using a polish which means you are using an abrasive to "cut" the top coat of the paint in order to remove imperfections.
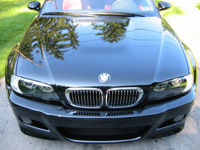
- How much you need to do will depend on the condition of your finish. My car was swirled to hell and back free of charge at delivery (after I told them 12 times not to detail it) so I had some serious work to do.
- Your car's color will also dictate how much you can actually see and how close you have to get to the finish in order to actually see stuff in it. If you have a silver car just go out and drive, forget all of this :-) If you have a Jet Black like this you're screwed
- Once you've done a section let it dry - don't do too much at once - you can always come back and hit it again if needed. Its always best to be conservative when using abrasives.
|
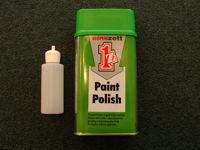
Einszett Paint Polish and Handy Little Application Bottle from Detailers
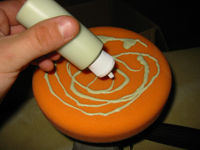
Einszett Paint Polish Applied to the Paradise 6 1/2" Orange Pad |
Step 8: What Goes On Must Come Off (part II)
- Once the Einszett Paint Polish has dried (about 5 minutes - it will develop a haze much like wax does) use a microfiber towel to remove it
- Work in circles without too much pressure until all of the Einszett Paint Polish is removed
- Turn the towel over often in order to make sure you're always using a clean, absorbent surface.
- The surface may look a little hazy after you remove the Einszett Paint Polish - don't panic - the next step will take care of this
- If you still see areas that need attention go back and repeat the above step
|
Einszett Paint Polish Drying |
Step 9: One More Time Into the Breach My Friends
- The Einszett Paint Polish is the much less abrasive of the two polishes you got from DetialersParadise.com
- Einszett Metallic Polish is the finishing touch to getting the surface ready for wax
- Einszett Metallic Polish will remove the hazing you may have noticed with the previous step
- Einszett Metallic Polish removes very little material - rather it helps put that final touch on the work you've already done
- Put the Paradise 6 1/2" White Pad on your PC
- Shake up the Einszett Metallic Polish (red can) and fill the little bottle with it.
- Apply the Einszett Metallic Polish from the little bottle to the Paradise 6 1/2" White Pad
- Same principle applies here, put the pad down on the car before turning on the PC
- Set the speed to #5 and kick the PC on
- Work the Einszett Metallic Polish into the surface to bring out the shine
- Once you're done with a section let it dry
|

Einszett Metallic Polish and Handy Little Application Bottle from Detailers
Einszett Metallic Polish Applied to the Paradise 6 1/2" White Pad |
Step 10: What Goes On Must Come Off (part III)
- Once the Einszett Metallic Polish has dried (about 5 minutes - it will develop a haze much like wax does) use a microfiber towel to remove it
- Work in circles without too much pressure until all of the Einszett Metallic Polish is removed
- Turn the towel over often in order to make sure you're always using a clean, absorbent surface.
- The surface should now shine and pop - if you still have a little hazing go back over the sections again as above
|
Einszett Metallic Polish Removed |
Step 11: Putting It All Together
- Once your happy with the results of your polishing work you're ready for wax
- There are obviously quite a few waxes out there. I like P21S Concourse-look Carnauba Wax because it goes on easy, provides an executional shine and depth and seems to last a reasonable amount of time
- The little container will likely last you longer than you will own the car and it comes with a handy little foam applicator
- Waxing with P21S is pretty easy. Simply get some wax on th applicator (its a little chunky) and apply it to small sections of the finish
- Don't get wax on unpainted surfaces - if you wipe it off as soon as possible otherwise it will be bitch to remove later once its dry.
- Sort of a trick with P21S is not to let it completely dry, you want to remove it just as it starts to haze - this gives better, richer results
- Removing wax should only be done with a microfiber towel, turned often in order to always present a clean surface to the finish
- You can put multiple coats of P21S on but you should wait about 24 hours between coats. I typically put 2 coats on.
|
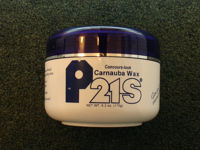
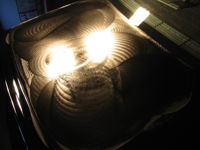
P21S Concourse-look Carnauba Wax
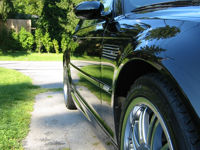
Results
Results
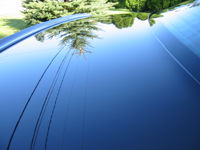
Results |
The Only Detailers Place You Need: DetailersParadise.com
Honestly most mail order companies suck - they want your money and nothing more. The reason I'm so high on detailers is because of the service Nick and his staff offer.
Being a complete detailing idiot I needed all the help I could get and I was pretty pissed at the condition of my car from the dealer. Nick really took the time explain the steps I needed to take to get my car to the way it should be - and surprise surprise - what he said worked precisely as he described.
Nick did not only recommend products he also told me how to use them and tossed in some tricks of the trade so that I could get the results I wanted. His prices are fair and his service is as good as you will ever find. A big MadRussian thumbs up to Detailers Paradise!
 |

|