|
 |
This takes 20 - 30 minutes. Difficulty level is really low - the most difficult part is waiting for the oil to properly drain.
Click on the images for larger views. |
Step 1: Getting the required items together
This install requires:
- 1 Oil Filter
- If using an OEM Filter part #11-42-1-730-389
- If using a Mann Filter ProTop #GT 926/3
(Mann makes the BMW OEM filter)
- 6mm Hex Socket
- 13mm Socket
- Socket Wrench
- Torque wrench (recommended)
- 6 Liters of Castrol TWS 10w60 Motor Oil
- Funnel (recommended)
- Drain Pan
- Rag or Shop Towels
- A BMW M3 (E46).
- 20 - 30 minutes of free time.
|
 |
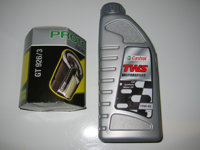
Mann Filter & TWS 10w60 |
Note:
- Your front end should be up on jack stands or ramps - otherwise it will be next to impossible to get under the car to drain the oil. See Getting car up on jack stands DIY or carefully drive the front wheels up on ramps.
- I assume that your car is already up on a lift, jack stands or ramps.
|
Step 2: Locate and Remove the Plastic Drain Plug Cover
- Look under the front end of the car down the center line of the car.
- You will see a black plastic plug directly behind the center jack point (see image).
- Use your fingers or a flat screwdriver to carefully pry the plastic cover from the back and then completely out.
- You will be able to see the drain plug once the cover is removed (see image).
|
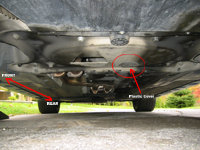
Plastic Cover Location
Plastic Cover Removed |
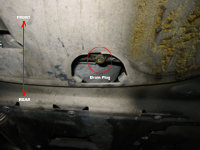
Step 3: Remove the Drain Plug and Drain Oil
- Situate your drain pan below the drain plug.
- Use the 6mm Hex socket to loosen and remove the drain plug.
- Let the oil drain.
- Note: The drain plug will have a crush washer, do not reuse this one, always use the new one supplied with the new filter.
|

Draining the Oil
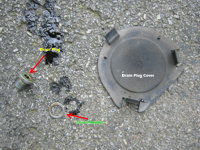
Drain Plug, Washer, Cover |
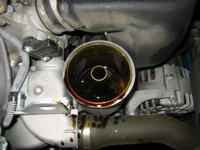
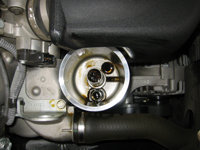
Step 4: Opening the Oil Filter Housing
- Once the oil is draining, you have plenty of time to change the oil filter
- Locate the oil filter housing (see image)
- Disconnect the TPS (Throttle Position Sensor) by pressing the spring clip on the side of the plug in and pulling the plug off (see image)
- Using a 13mm socket remove the bolt at the top of the filter housing and pull it all the way out.
- Remove the lid from the filter housing - it might take a little bit of effort to take the cap off as it seems to "bake on" to the case (see image)
|
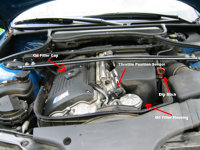
Oil Related Items Under the Hood

Disconnecting the TPS
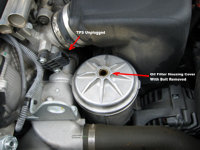
Pulling Out the Bolt
Removing the Cap |
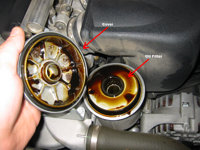
Step 5: Removing the Old Filter
- This can get very messy - the filter is saturated with oil.
- I like to use a thick plastic bag and get it as close as possible to the filter before I pull it out of the case.
- Once you have your bag ready pull the filter out of the case.
|
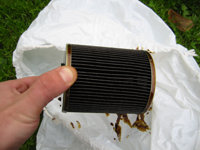
Old Oil Filter |
Step 6: Cleaning Up Part I
- Its probably a good idea to wipe up the old, dirty oil out of the filter housing after the filter is removed.
- I use a shop towel to soak up the old oil and wipe out the rest of the case. I'm never shoot for spotless, just relatively clean.
|
Filter Housing After Filter Is Removed
Cleaned Out Filter Housing |
Step 7: Cleaning Up Part II
- The oil filter housing cap has a rubber grommet in a channel around the edge - use a knife or a small screwdriver to pull it out.
- Wipe out the oil filter housing cap.
- The bolt has a small rubber grommet at the end, remove it.
- There is also a washer at the top of the bolt, remove it as well.
- Wipe off the bolt and the cap.
|

Pieces and Parts
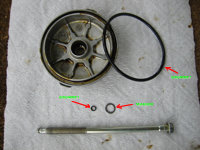
Pieces and Parts - Removed |
Step 8: Installing New Grommets/Washer
- Using the parts from the new filter, replace the rubber grommets on the bolt and the cap and the washer on the bolt.
- The washer with the smaller opening is the washer for the bolt - the other washer (with the larger opening) is for the drain plug.
|
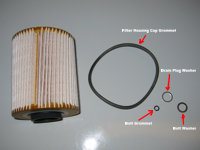
New Oil Filter and Parts

New Grommets & Washer Installed |
Step 9: Reinstalling the Drain Plug
- Wipe off the drain plug and replace the washer with the new one.
- Check to see that the oil has stopped draining from the crank case.
- If its done draining, replace the drain plug and torque it to 18 ft lbs.
- Pop the plastic cover back into place - you're done under the car!
|
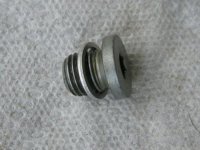
Drain Plug and Washer |
Step 10: Installing the New Oil Filter
- Drop the new filter into the filter housing.
- Many people (including myself) believe that it is a good idea to pre-saturate the filter with oil to reduce the amount of oil starvation at start up.
- To do this, simply pour between 2/3 and a full bottle of oil over the filter (not down the center though) - pour slowly or you will get it all over the place.
|
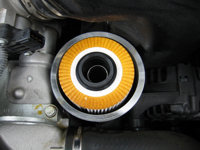
New Filter In Place
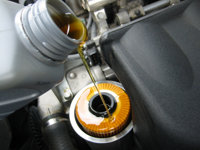
Pre-Saturating the New Filter |
Step 11: Closing Up the Filter Housing
- Make sure both grommets and washer are in place on the cover and bolt and install the cover on top of the exposed oil filter.
- The cover may sit up a little off the case due to the height of the filter (this is intentional to make sure it seals up correctly).
- Insert the bolt and torque it down to 24 ft lbs.
- Plug the TPS (throttle position sensor) back in by simply sliding it back into place until it snaps in.
|
|
Step 12: Filling the Beast With Oil
- There seems to be some confusion as to how much oil an S54 engine requires. In my case I have never had to put in more than 6 bottles which is 6 liters of oil. The number that floats around is 6.3 - but the reference is 6.3 quarts and NOT 6.3 liters (as in 6.3 bottles) - simple math, a liter is 1.05 quarts X 6 = 6.3 quarts.
- Remove the oil filler cap (see first image in step 4).
- Put your funnel in and pour the remaining oil into the engine - take your time, don't make a mess and let all the oil drain out of each bottle.
- Replace the oil filler cap.
|
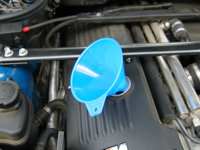
Funnel In Place |
Step 13: Checking Your Work
- Take the car for a short spin.
- Let it idle for a minute or two.
- Shut the car off and let it sit for a minute (ain't the BMW oil checking routine a blast?!)
- Check the oil level - 6 liters puts the oil right at the top mark in my car. Add oil if needed.
- Dispose of the old oil and filter correctly by taking it to an approved facility.
|
The Dipstick |

|